February 24, 2010

Homemade Chocolate Cake

This chocolate cake is to die for! I recently made cupcakes with this recipe and frosted them with the Chocolate Buttercream Frosting that you can find on this blog. My mom brought them to work and someone said “This is damn near the best cupcake I ever had.” If that doesn't convince you I don't know what will. For your next birthday celebration, or any special occasion you should make this chocolate cake!

1 ¾ cup flour
2 cups sugar
¾ cup cocoa
1 ½ tsp baking soda
1 ½ tsp baking powder
1 tsp salt
2 eggs
1 cup milk
½ cup oil
1 tsp vanilla
1 cup boiling water

Preheat oven to 350 degrees. Mix dry ingredients. Add remaining ingredients except for water. Beat at medium speed for 2 minutes. Add boiling water and beat. Pour into a greased/floured 9 x 13 pan. Bake for 35 - 40 minutes.**If making cupcakes, only fill half full (seriously, no more than half!) and bake for about 12-14 minutes.


I suggest adding some kind of sprinkle to bring in some color to all of the chocolate!

February 23, 2010

Shrimp Stir-Fry

One of the features in the newest food network magazine is about stir-fries. The recipe is set up so you can mix and match different proteins, vegetables and sauces to create your favorite stir-fry in five easy steps. It was very easy! Here is the tasty stir-fry I came up with:

1. Pick a Protein: Shrimp. ¾ of a pound, raw, peeled and deveined, no tails.

2. Marinate: Whisk 1 egg white, 1 tablespoon Chinese rice wine or dry sherry (I used dry sherry) and 1 tablespoon cornstarch. Toss with your protein; cover and refrigerate, 1 hour.


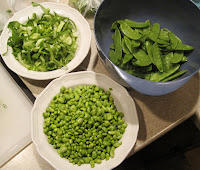
3. Prep 3 cups Vegetables: Whole Snow Peas, Edamame, Slice Baby Bok Choy


Fun Fact: When slicing bok choy, you use the all of it; the leafy lettuce like part as well as the celery looking part.


4. Choose a Sauce: Clear Sauce. Mix ¾ cup chicken broth, 1 tablespoon cornstarch, 2 tablespoons Chinese rice wine or dry sherry, ½ teaspoon sesame oil, 1 teaspoon salt and ½ teaspoon sugar.

5. Stir-Fry. Drain the excess marinade from the protein. Place your sauce, vegetables and protein near the stove. Heat ¼ inch peanut oil or vegetable oil in a wok or skillet over medium heat (it is important to make sure the bottom of the pan is covered completely in oil, the egg from the marinade will cause your protein to stick to the wok or skillet if you don’t). Add the protein; slowly stir until almost opaque, 30 seconds to 1 minute. Transfer to plate; discard the oil and wipe out the pan.


Heat the pan over high heat, 1 to 2 minutes. Add 2 tablespoons oil, then 2 cloves minced garlic, 1 to 2 tablespoons minced ginger, 2 minced scallions and a pinch each of salt and sugar; stir-fry about 30 seconds.


Add the vegetables, starting with the ones that take the longest to cook; stir-fry until crisp-tender. I started with the edamame, then snow peas, then baby bok choy.


Add the protein and sauce and stir until the sauce is thick and the vegetables and protein are cooked through, about 3 minutes. I put the lid on the skillet to trap the heat and help thicken the sauce. Garnish with sliced scallions, peanuts, sesame seeds, or sliced cilantro. I used sliced scallions, sliced cilantro, and served over white rice.


I doubled the recipe (plus another half) and that fed 5 adults with little to spare. You can switch out the vegetables with others you may like more. Also, as far as the protein goes, you can use ¾ lb. of flank steak, pork tenderloin, skinless/boneless chicken breasts or thighs, or 12-ounce package extra-firm silken tofu, cubed.

This stir-fry was very good! It was a perfect mix of flavors. Not too salty, nor too sweet. The shrimp kept it light and the green veggies made it a refreshing dish with a nice, crisp texture. Everyone loved this stir-fry so I encourage you to make it and put your own twist on it!

February 22, 2010

Pizza Dough

I’m doing a theology project that requires me to be a vegetarian and not eat any sugar for three weeks. This creates a big hurdle because sugar is in everything and I love meat. I’ve been making lots of trips to Whole Foods and buying organic products with no sugar. I was craving pizza so I decided to find a pizza dough recipe with no sugar. The recipe is courtesy of Paula Deen and this dough is really easy to make and really good!

1 ¾ cup Warm Water
1 (¼ ounce) package Active Dry Yeast
2 teaspoons Salt
5 cups Bread Flour
3 tablespoons Olive Oil, plus more for bowl
Cornmeal, for pan
Desired Toppings

Measure the warm water and sprinkle the yeast on top of the water allowing it to activate, about 10 minutes. Put the salt and 2 cups of the flour into a food processor. Pulse 5 times to blend. Pour in the yeast and water and pulse 5 times. Add the olive oil. Add the remaining flour 1 cup at a time, pulsing and scraping the sides of the bowl until well blended. As soon as the mixture is combined, dump it out onto a well-floured board and knead for 15 turns, until the dough is smooth and elastic.

Preheat the oven to 450 degrees. Grease the side of a bowl with some olive oil and place the dough in it. Cover with plastic wrap and allow the dough to rise in a warm place for about 45 minutes, until doubled in size, and then punch it down. Divide it in half; each half will make 1 (12-inch) pizza.


Place on a cornmeal-dusted pizza, pizza pan, or cookie sheet. Roll up edge slightly to create a ridge around the pizza. Brush the dough lightly with olive oil to prevent the sauce from making the pizza soggy.

Note: If only using half of the dough, freeze the other half. Place the dough in a resealable freezer bag. To thaw, remove the bag from the freezer and place in the refrigerator for 24 hours. Roll the dough out while cold then allow it to come to room temperature before adding toppings.


Top your pizza as desired and bake 16-18 minutes, or until crust is light brown. I topped my pizza with fresh mozzarella, a little cheddar, sliced garlic, shallots, and green onions. I froze the other half of the dough so when I can eat meat, I will make a delicious meaty pizza!

February 21, 2010

Be a Whiz in the Kitchen

The February edition of Twin Cities Metro Magazing has a really cool feature article on how to do everything...almost. I found eight great tips in the "be a whiz in the kitchen" section that I think everyone should know. Here they are:

1. To get the most juice from a lemon, microwave it for 15 seconds. (Rachel Ray taught me this and it works with oranges and limes as well.)

2. To avoid curly bacon, dip it in cold water before cooking.

3. To chill wine quickly, put the bottle in a bucket with ice, water and a handful of salt.

4. To keep potatoes from sprouting, put an apple in the bag with them

5. To avoid tears that come with cutting an onion, stick it in the freezer for 20 minutes before chopping. (I'm very excited to try this because chopping onions is my weakness, I always cry.)

6. To reduce the toots, add a pinch of baking soda to beans while cooking.

7. To turn milk into buttermilk, stir 1 tablespoon vinegar into 1 cup of milk.

8. To remove garlic smell from your fingers, dip a stainless steel knife or spoon into lemon juice and rub it between your fingers for 60 seconds.

Try them out!

February 18, 2010

yum! Kitchen and Bakery

A few friends and I recently went to yum! Kitchen and Bakery. This was my second visit to yum! and both visits were within the last monthish. The point: it is really good and I highly recommend it.

The first time I was there I ordered the Steak Sandwich. Mmmmm…it was so good that I also got it the second time. Here’s the breakdown: grilled beef tenderloin, red pepper aioli & arugula on herb focaccia. The combination of the medium rare tender beer, the herbs on the bread, the aioli and arugula is to die for. This may be the best steak sandwich I have ever had (The Good Day Café’s steak sandwich is right up there). If you are thinking okay this girl has only ordered the steak sandwich, how does she know everything else is good? It is. They make everything from scratch!!

I also ordered a cup of the tomato soup that was perfect. It wasn’t like the canned soup where you feel like you are drinking tomato water. Nor was it so chunky that you felt like you were eating a whole tomato. It was the perfect combination of creaminess with small chunks of tomato and likely onion, garlic and some other good stuff. My friend Rachel ordered the Macaroni and Cheese and when she finished I had to try some. The pasta was cooked perfectly and the cheese was warm and creamy. Also very good. Everyone at the table enjoyed their meal.

Now let’s talk about their bakery. The first things you notice when you walk in are the giant cupcakes. They are so perfectly decorated that they look magical. The amount of frosting placed on each cupcake is almost intimidating. I initially assumed that I would be scraping about two thirds of the frosting off. However, have no fear the frosting is not like the sugary frosting you would get on a cupcake from the grocery store, the almost inedible kind. It has just the right amount of sugar and sweetness to compliment the chocolate cupcake and not overpower it. I tried the Red Velvet cupcake and the Chocolate cupcake. They were both delicious and moist; there’s nothing worse than a dry cupcake. I do recommend sharing the cupcake since they are huge.


Or, take a few to-go and they will package them up in a cute little box.

You can eat in the restaurant or take the food to-go. If you order ahead, you can pick up boxed lunches. The atmosphere is very bright, open and casual. You place your order; they give you a number for your table, and bring you the food when it’s ready (like how it’s done at Noodles & Co.). They often change their menu to offer the best food for the current season. They also have a variety of beverages including some really good beer, in the bottle of course. The prices are reasonable. They have food for all ages so I encourage you to check it out if you haven’t already. You can find out more online at www.yumkitchen.com

February 17, 2010

Pork & Shrimp Dumplings

February 14th this year was not only Valentine’s Day, but the Chinese New Year. So my mom and I decided to make a nice Chinese meal. My grandma passed on a cookbook to my mom which has amazing Chinese Recipes. (It will be mine someday since my sister only likes to makes ramen). It is Betty Crocker’s “Chinese Cookbook.” Recipes by Leeann Chin. I’m not sure if it can be purchased these days since it was copyrighted in 1981. It’s older than me. And to make it even better, Leeann Chin autographed the cookbook and left the message of “Happy Cooking” to my grandmother. This obviously means the stuff inside is legit.

I made the appetizers since I have the most patience and wanted to. I made Pork Dumplings and Shrimp Dumplings with Ginger-Soy sauce. Other than the assembly they were super easy and make a ton. For the Pork Dumplings I actually cut the recipe in half because when I read that it yields 40 dumplings I thought that was a little excessive for my family. I guess if you’re feeding a small army 40 would be good. Here it goes:

Pork Dumplings
8-10 Medium Dried Black Mushrooms
1 lb. Ground Pork
½ cup Finely Chopped Canned Bamboo Shoots
¼ cup Finely Chopped Green Onions (with tops)
1 Large Egg White
2 tbsp. Cornstarch
2 tsp. Salt
2 tsp. Light Soy Sauce
½ tsp. Sesame Oil
¼ tsp. White Pepper
40 Wonton Skins

¼ cup Light Soy Sauce
⅛ tsp. Sesame Oil

Soak mushrooms in warm water until soft, about 30 minutes; drain. Rinse in warm water; drain. Remove and discard stems; chop caps finely.


Mix mushrooms, pork, bamboo shoots, green onions, egg white, cornstarch, salt, 2 teaspoons soy sauce, ½ teaspoon sesame oil and the white pepper. While the mushrooms were soaking I got everything else together in the bowl and then once they were ready, I added the mushrooms in last.

You should buy the Wonton Skins that are circular. If you buy the square ones you will be cutting them to make a circle.

Place 1 tablespoon pork mixture in center of circle.


Bring edge up around filling, leaving top open. Repeat with remaining circles. (The plate is courtesy of my brother in about 1995. Its a hockey game scene...if you couldn't figure it out.)


Place dumplings in single layer on rack in steamer; cover and steam over boiling water 20 minutes. (Add boiling water if necessary.) We do not have the proper Chinese steamer but made with other pots and pans. Repeat with remaining dumplings.


Mix ¼ cup soy sauce and ⅛ teaspoon sesame oil; serve with dumplings. Like I said before this recipe makes 40 dumplings. I cut it in half and made 14 bigger ones. They are very very good!

Shrimp Dumplings
½ lb. Fresh or Frozen Raw Shrimp (Peeled & De-veined)
¼ cup Sliced Canned Bamboo Shoots
1 tbsp. Finely Chopped Green Onions (with tops)
2 tsp. Vegetable Oil
½ tsp. Corn Starch
½ tsp. Salt
⅛ tsp. Sesame Oil
Dash of White Pepper
24 Wonton Skins (round ones)

Ginger-Soy Sauce
¼ cup Dark Soy Sauce
¼ cup White Vinegar
2 tsp. Finely Chopped Gingerroot
2 tsp. Sesame Oil
1 tsp. Finely Chopped Garlic

If the shrimp are frozen, do not thaw; place under running cold water. Cut shrimp into ½-inch pieces. Cut bamboo shoots into ¼-inch pieces.


Mix shrimp, bamboo shoots, green onions, vegetable oil, cornstarch, salt, sesame oil and white pepper. Cover and refrigerate 10 minutes.


Place 1 teaspoon of the shrimp mixture in center of the circle.


Pinch 4-5 pleats on edge of one half of circle. Fold circle in half pressing pleated edge to unpleated edge. Repeat with remaining slices of dough.


Place dumplings ¼ inch apart on heatproof plate. Place plate on rack in steamer; cover and steam over boiling water 10 minutes. (Add boiling water if necessary.) Mix the soy sauce, white vinegar, gingerroot, sesame oil and garlic, serve with dumplings.


These are also very good but I think the crowd favorite was the pork dumplings. Be adventurous and try one of them!

February 14, 2010

Snack Time: Pickles


The other night I was watching "The best thing I ever ate" a show on the Food Network channel where chefs visit their favorite spot of something very delicious they once had to eat. This episode was all about Snacks. Ted Allen discussed his favorite snack is one of McClure's Pickles. This was the exact moment when I realized that it is okay to snack on pickles, which I occasionally do. So for everyone that thinks that is weird…it’s not. It also gave me the urge to try one of McClure’s pickles.

Two brothers, one in New York and the other in Detroit had the idea to start a pickle company with their great grandmother’s recipe and help from their grandfather. They use local products and each jar is hand packed. They sell garlic dill and spicy pickles as well as a relish. You can order cases from their website, but they are ridiculously expensive. They are also sold in various retail locations and Surdyk’s in Minneapolis is one of them. So I will be making my way there to get myself a jar or I will just have to wait until I am in New York this summer.

They also have some recipes for cooking with pickles. All can be found on their website. www.mcclurespickles.com

February 11, 2010

A Good Burger

I know burgers are more of a summer thing but I can always go for a good burger. The concept of putting the cheese inside the burger started in our wonderful little city of Minneapolis and is my favorite way to make burgers. I have enjoyed a handful of burgers that were stuffed with not only cheese but all sorts of stuff. It’s all about getting creative with different flavors. So this is my recipe that I found to be pretty delicious. It makes two burgers.

• 1 lb. of ground beef (you need ½ lb. per burger)
• Worcestershire sauce
• Fresh Chives, chopped
• Salt or Garlic Salt, Pepper for seasoning
• 2 tbsp. Butter
• 2 Onion Slices
• Chopped Mushrooms
• ½ of a Garlic Clove, chopped
• Swiss Cheese, sliced

In a bowl mix the ground beef with some Worcestershire sauce. I used my best judgment and poured it over the beef; you don’t always need to measure when cooking. Do as much as you think looks good. Add about 3-4 tablespoons of freshly chopped chives, and sprinkle some salt and pepper over the meat. Then with your hands mix it all together.


In a sauté pan, melt the butter and add the slices of onion, chopped mushrooms (these are for the inside so use as many as you want in your burger), and the little bit of garlic. Sauté until the onions are caramelized, they should look a little brown and clear. Once the onions slices are caramelized, it is a good idea to chop them into bite size pieces.

Divide the meat into fourths and form each section into a patty. You want the patties to be thin and wide in diameter. On one patty add 2-3 small pieces of Swiss cheese, some of the caramelized onions and the chopped mushrooms. Make sure you stack the ingredients in the middle of the patty so there is about ¾ of an inch of meat around on all sides. Place a patty on top and pinch the edges together tight making sure you cannot see the seam. This part is very important otherwise the patties will split while cooking. Make the second burger and more if you decide to double the recipe. The burgers will be pretty thick.


In the summer, I would grill these outside however cooking them in a sauté pan is the way to go when you live in Minnesota and its February. They take a while to cook since they are very think, about 25-30 minutes. The cheese on the inside must be melted otherwise you know the inside of the burger is still cold and therefore raw. If you really like cheese, then melt some on top too.


I don’t think these need ketchup but if you can’t eat a burger without ketchup then use some. I would suggest eating this burger with a nice cold beer. I enjoyed Goose Island’s India Pale Ale with my burger and highly recommend it. In fact, I am drinking one right meow…Yummy!

February 9, 2010

Mini Peanut Butter Cupcakes

There was an article in my Jan/Feb issue of the Food Network Magazine about cupcakes that taste like different candies. My friend Molly is obsessed with chocolate and cupcakes so I asked her if she wanted to make one of the recipes with me. Since I got a bright red Kitchen Aid mixer for Christmas (yes Christmas, not a wedding gift) I am always looking for things to make in it. We decided on the cupcakes that taste like a Reese’s peanut butter cup. I mean who doesn’t like chocolate and peanut butter?

We of course had to go to the store to get almost all the ingredients because a college house doesn’t really keep an inventory of baking ingredients on hand. It’s always a surprise as to what is in our baking cupboard. Interestingly enough we had cocoa powder but no eggs or butter. Basically you commit to a grocery store trip anytime you want to bake something…but it’s usually worth it. This recipe requires some time and patience since there are three components to the cupcakes, but once they are in the oven you can make the other parts.

For the Cupcakes:
• 12 tablespoons unsalted butter, cut into pieces
• 1/2 cup Dutch-process cocoa powder
• 1 1/3 cups packed dark brown sugar
• 1 1/3 cups all-purpose flour
• 1/2 teaspoon baking powder
• 1/4 teaspoon baking soda
• 1/2 teaspoon salt
• 1/3 cup buttermilk
• 1 large egg, at room temperature
• 1 teaspoon vanilla extract

For the Topping:
• 1/2 cup heavy cream
• 1 10-ounce bag peanut butter chips

For the Glaze:
• 1 tablespoon unsalted butter
• 6 ounces milk chocolate, finely chopped

The cupcakes: Position a rack in the middle of the oven and preheat to 350 degrees F using the convection setting, if available. Line a 24-cup mini muffin pan with paper liners. So we couldn’t really find mini paper liners so we just sprayed a bunch of Pam on the pan and hoped that they didn’t stick. Combine the butter, cocoa powder and 1/4 cup water in a microwave-safe bowl, cover with plastic wrap and microwave until the butter melts, about 2 minutes. Whisk to combine, then whisk in the brown sugar.

Whisk the flour, baking powder, baking soda and salt in a large bowl. Whisk in the warm cocoa mixture. In another bowl, whisk the buttermilk, egg and vanilla; stir into the batter until just combined but don't overmix. Congratulations…you just dirtied three different bowls.

Divide the batter among the prepared cups, filling each three-quarters of the way. Bake until the cupcakes spring back when touched, about 20 minutes. Let cool in the pan 5 minutes, then transfer to a rack to cool completely.

The topping: Bring the cream to a simmer in a small saucepan, then pour over the peanut butter chips in a bowl and let stand until the chips melt, about 5 minutes. It is important that the cream is hot and you really let the chips melt otherwise your topping will have peanut butter chunks and not be smooth. Whisk until smooth. Refrigerate until the topping is set, about 10 minutes, then beat with a mixer until fluffy. Transfer to a pastry bag with a 1-inch round tip and pipe peaks onto each cupcake. Place in the freezer while you make the glaze.

The glaze: Put the butter, chocolate and 3 tablespoons hot water in a small, deep microwave-safe bowl, cover with plastic wrap and microwave on 50 percent power until the chocolate melts, about 2 minutes. Whisk until smooth. Dip the frozen peaks of each cupcake into the glaze, letting the excess drip off. Refrigerate until set, about 5 minutes.

We obviously don’t have a pastry bag. I don’t operate a bakery. Normally I would use a platic bag and cut off the corner but our peanut butter topping was too thick so we just had to smear it on. We didn’t really have a problem with the glaze dripping off the cupcakes but we also didn’t have “frozen peaks.” It was my food stylist’s day off and without a pastry bag our cupcakes didn’t really look like they were supposed to. (pictures below). I’m sure you can come up with your own opinion on what they look like..haha..but it’s the taste that really matters.


These cupcakes were very good and did taste pretty close to a Reese’s peanut butter cup. I love baking but never really find myself eating a lot of what I make. Although I only had one, the rest were consumed by my roommates/friends. It seemed like they were almost addicting for some. When I walked upstairs after a bunch of them were watching the Grammy’s I noticed there was only one left. I asked “Who’s going to eat the last one?” They all said something along the lines of “Oh god, get that away from me…I’ve had like 3 already.” (Honestly, I’m not saving one MINI cupcake. If you’ve had three you can eat one more…you’re clearly beyond counting calories.) Anyway…that just shows how good they are. I challenge you to make them look more appetizing then ours did!

February 8, 2010

Fantastic French Onion Dip


My friend Sarah and I have always wanted to make French Onion dip. We would enjoy it in the cafeteria for lunch and it was always delicious but for some reason when I bought it from the store it was not good. It could’ve been that I simply chose the wrong brand but it was gross. I was inspired to make it so I found a recipe courtesy of Food Network’s Triple D man Guy Fieri. I must say that this dip is very good! It is very easy to make, unless you live in a college house with knives so dull you have to saw the onions…but I managed.

• 2 tablespoons unsalted butter
• 2 Vidalia onions, sliced into 1/4-inch-thick rings
• 2 large shallots, sliced into 1/8-inch-thick rings
• 3 cloves garlic, minced
• 2 cups sour cream
• 1 cup mayonnaise
• 1 teaspoon celery salt
• 1 teaspoon Worcestershire sauce
• Kosher salt and freshly ground pepper
• Chives, finely chopped, for garnish
• Potato chips, for serving

In a large sauté pan, heat the butter over medium-high heat. Add the onions and sauté, stirring occasionally, for 15 to 20 minutes, or until golden brown and caramelized. It is a good idea to chop the shallots while the onions are sautéing. Add the shallots and sauté for 8 to 10 more minutes, until the onions and shallots are dark brown. Like before, now is a good time to mince the garlic, while the shallots are being sautéed. Add the garlic and sauté for 2 minutes. Remove from the heat and let cool for 5 minutes.

While the onion mixture is cooling, mix in a bowl, the sour cream, mayonnaise, celery salt, Worcestershire sauce and 1 teaspoon each salt and pepper. Chop the onion mixture into 1/4-inch pieces. Set aside to cool to room temperature. Fold the onion mixture into the bowl with the sour cream and mayo. Refrigerate at least 1 hour or overnight. Garnish with chives and serve with potato chips.

This makes about 3 1/2 cups which is plenty since it’s made with mayo and sour cream. I think the wavy or ruffled potato chips work best, but that’s up to you. If you really like caramelized onions or French onion dip in general, you will love this dip! Enjoy!

February 3, 2010

Chicken...ugh

So I went to my parent’s house for dinner…meaning I was likely going to make it, and what did they take out to thaw?? Chicken….woo hoo. We are always eating chicken. Between some Asian, Italian or BBQ version the Winslow family eats a lot of Chicken!

I remembered that there was an article in my Food Network Magazine about different variations of chicken wings and while these were chicken strips I figured we would survive. By default we had to make the Caribbean Chicken since we had all but one of the ingredients. The others either required breading (my brother’s allergic to wheat) or our pantry was lacking a serious amount of the recipe. So in an attempt to stray away from one of our typical family meals my mom and I began pulling out everything we needed.

I read further into the recipe and soon discovered that the poultry needed to marinade for four to six hours. Since it was around eight o’clock, I threw the chicken in the fridge until the oven pre-heated. Four hours…10 minutes…whatever. Needless to say the chicken was different. It was edible, with leftovers. Fortunately we had beans and rice on the side so no one went hungry. It was a change but nothing I need to make again or share. Perhaps sticking with the same old recipe isn’t that bad. Lesson learned.

February 2, 2010

Game Day Guacamole


With the Super Bowl coming up, I thought it would be appropriate to share a potential game day snack. Who doesn’t love chips and guac? This recipe is not the typical guacamole but it is definitely delicious. My cousin’s secret, and now my secret, is to add roasted corn. Trust me it’s good and easy to make!

This recipe makes enough for my five member family however we are all adults, so adjust according to your situation…it’ll get eaten.

5 Ripe Avocados
1½ Cups Corn
2-3 Tbsp Olive Oil
Salt
1 Cup Chopped Red Onion
2-3 Garlic Cloves
1-2 Jalapeños Finely Chopped
1 Chopped Tomato
3 Tbsp Chopped Cilantro
1 Lime


First peel and pit the avocados, and mash them in a medium sized bowl. For the corn: in the summer I would suggest using fresh corn cut off the cob, however since this is winter in Minnesota, frozen corn will suffice. Toss the corn in the olive oil and place on a cooking sheet. Sprinkle salt over the corn and place in the oven on the broil setting for about 5-8 minutes, until some kernels are golden. Add the red onion, jalapeño(s) and garlic cloves to the avocados and mix in thoroughly. I would suggest using one jalapeño at first and if you think it needs more kick, add the other one. I usually use about one and a half. Mix in the roasted corn and the chopped tomato. Next add the cilantro and the juice of half a lime and mix again.

Now try the guacamole. It could be the case that you think it is lacking something- cilantro, lime, garlic. Add more of what you think is missing, I’m not offended, that is why guacamole is so easy and fun to make!

I would recommend eating/serving it with a salty tortilla chip. The combination of the salt on the chip and the fresh home made guacamole is amazing. Enjoy!

February 1, 2010

The Best Chocolate Buttercream Frosting

While I know most people order cakes these days for special events, if you have the time, I encourage you to make your own. It is so much more meaningful and most of the time tastes better. My friend and I recently made a birthday cake and decided to make the frosting. You cannot go wrong with a buttercream, let's be honest, butter is amazing! So I stumbled upon a recipe from Ina Garten and with a few modifications came up with this somewhat putsy but sweet, fluffy, delicious, and totally worth it chocolate buttercream frosting.

• 16 ounces semisweet chocolate
• 3/4 cup egg whites (4 to 5 extra-large eggs), at room temperature
• 1 1/2 cups granulated sugar
• 3/4 teaspoon kosher salt
• 1 1/2 cups unsalted butter, at room temperature
• 3 teaspoons pure vanilla extract

Chop the chocolates and place them in a heat-proof bowl set over a pan simmering water. Stir until melted and set aside until cooled to room temperature. It helps to occasionally stir it so the chocolate at the bottom of the bowl does not burn.

Mix the egg whites, sugar, and salt in the bowl of an electric mixer fitted with a whisk attachment. Place the bowl of egg whites over the pan of simmering water and heat the egg white mixture until they are warm to the touch, about 5-10 minutes. Return the bowl to the electric mixer and whisk on high speed for 5 minutes, or until the meringue is cool and holds a stiff peak.

Add the butter, 1 tablespoon at a time, while beating on medium speed. Scrape down the bowl, add the melted chocolate and vanilla, and mix for 1 minute or until the chocolate is completely blended in. If the buttercream seems very soft, allow it to cool, and beat it again.

This frosting makes about four cups. We covered two 9" round cakes and had some to enjoy later. Once you make this frosting I can guarantee you will never buy canned frosting again!